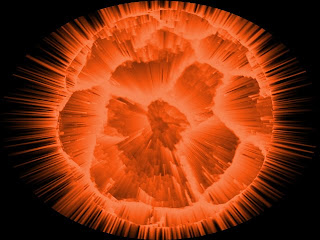
This is an awesome project for Photoshop. This is hard to get down, but after a while you can do it in a matter of minutes. If you have Photoshop go ahead and try this tutorial.
Exploding planet tutorial:
1. Create a new 640x480 file
2. Open the dried dirt and press Control+A. use the move tool to move the dirt to the new empty file.
3. Go to Filter-Adjustment-Invert (or press Control+I)
4. Now use the elliptical marquee tool and make a large round selection on the image. Hold SHIFT while you create the selection to make a perfect round circle.
5. Now go to Select->Inverse
6. Then hit Delete so you are left with a circle from the mud image. DO NOT DESELECT YET
7. Now, while you still got your selection, go to SELECT->INVERSE again to select the shape.
8. Now go to Filter->Distort->Spherize. Set amount to 100%. Then do it again, this time, 50%.
9. You can now deselect.
10. Use the paint bucket tool to fill in the background with Black
11. Then go to Layer->Flatten Image
12. Now go to Enhance-Unsharp Mask. Amount: 500%. Radius:1.7px. Threshold: 122 levels
13. Go to Filter->Distort->Polar CoordinatesCo-ordinates. Options: Polar to Rectangular
14. Go to: Image->Rotate >90 right
15. Apply: Filter->Stylize->Wind. Method: Wind. Direction:From the right.
16. Hit CTRL+F to reapply
17. Image->Rotate >90 left
18. Finally, apply Filter->Distort->Polar Coordinates. Options: Rectangular to Polar
19. There you go, now all you do is just play around with colors, by either using Half black and white circle- Hue and Saturation.


No comments:
Post a Comment